Autor: Ionuț Staicu
-

How to hot-link assets to production?
This is tested for WordPress and assumes there is no hot-link protection in place. One of the painpoint I had for the past decade was: how to create a local development of a live environment without copying all the files locally. Sometimes copying files is not really the best option as it will use lots…
-

Get the best out of DDEV
I’m a Windows guy. I’ve always was, I’ll (probably?) always be. But I’m also a developer that writes quite a lot of PHP, so sometimes things aren’t working as smooth as I would like. Until recently, my dev environment was a windows nginx.exe with a bunch of php.exe wired up and everything used to work…
-

Create Elementor migration/upgrade scripts
Every now and then, you may need to migrate something on existing Elementor widgets. One solution would be to go through every single template and change it by hand, but we’re not savages. Note that migration in this context means that we have the widget in place but we update some of its values. So…
-

N-are cum să fie asta, nu?
Acum aproape trei săptămâni fac un deploy în organizația cu care lucrez. După câteva ore, lucrurile încep să o ia la vale: procesoarele serverelor erau la 100%, memoria și baza de date abia erau atinse. Interludiu Înainte să intru în detalii, să spun întâi despre cum funcționează bestia. Mediul în care rulează toată povestea este…
-

Conflicte în composer autoload
TL;DR: folosește __DIR__ când incluzi un fișier. Recent am avut o situație tare interesantă în WordPress: folosesc composer autoload în mai multe locuri (câteva plugin-uri, temă) și la un proiect am început să primesc erori. Autoloader-ul nu mai găsea o clasă în temă. Rulez composer dump în temă, nu mai găsește altă clasă în pluginul…
-

Tips & Tricks PowerShell
Mi se pare că PowerShell are parte de mult mai puțină atenție decât merită. Pentru ce fac eu, mi se pare mult mai intuitiv/expresiv/user-friendly/readable decât Bash. Fac comparația asta pentru că (inițial) Microsoft a vrut ceva în genul Bash pe Windows. Și au mers foarte mult pe inspirație: pipes, alias-uri pentru comenzi (astfel încât, până…
-

Cum migrezi un WordPress multisite?
Una din problemele cu care mă confrunt frecvent este aceea de a migra o instanță de WordPress de pe un domeniu pe altul (e.g. din live în development). La site-uri simple este o operațiune rapidă, wp search-replace url.vechi url.nou, dar lucrurile se complică atunci când este un multisite și/sau are o bază de date imensă.…
-

Actualizarea plugin-urilor WordPress și versionarea acestora
Deși sunt adeptul ideii de a nu ține în Git fișierele care nu-mi aparțin: plugin-uri, fișierele din core etc, sunt unele situații în care este nevoie și de asta. Prin urmare, nu am acordat prea multă atenție acestui mod de lucru: când e vorba de actualizări disponibile, facem actualizare la tot, trântim un commit cu…
-

WordPress menus are lost on server migration!
I had this issue for a very long time: a live server with a bunch of menus was allright. Trying to migrate the DB locally (for syncing), usually ended up in a mess, because menus were gone. No matter what tools I was usings, be it mysqldump, migrate db or anything else, menus were GONE! …
-

Autoformatarea codului
Relativ recent am descoperit că pot face auto-formatarea codului la… commit. Da, știu, mind blowing 😀 Eu am nevoie de formatarea SCSS, JS, JSON și PHP. Folosesc întotdeauna composer câteva pachete node, deci am packages.json și composer.json mereu în proiect. Prin urmare, folosim câteva pachete Node pentru a face treaba: Husky instalează hooks de git necesare, lint-staged…
-

Learning React: Atributul key={}
Mă tot gândeam: cum ar fi să scriu câte un articol despre lucrurile de care m-am lovit învățând React? Prin urmare, ăsta este primul post. Dacă or mai veni altele sau nu… vedem. Atunci când randezi un element într-un loop (map, forEach), este recomandat să îi adaugi acelui element un atribut numit key. Acesta nu…
-
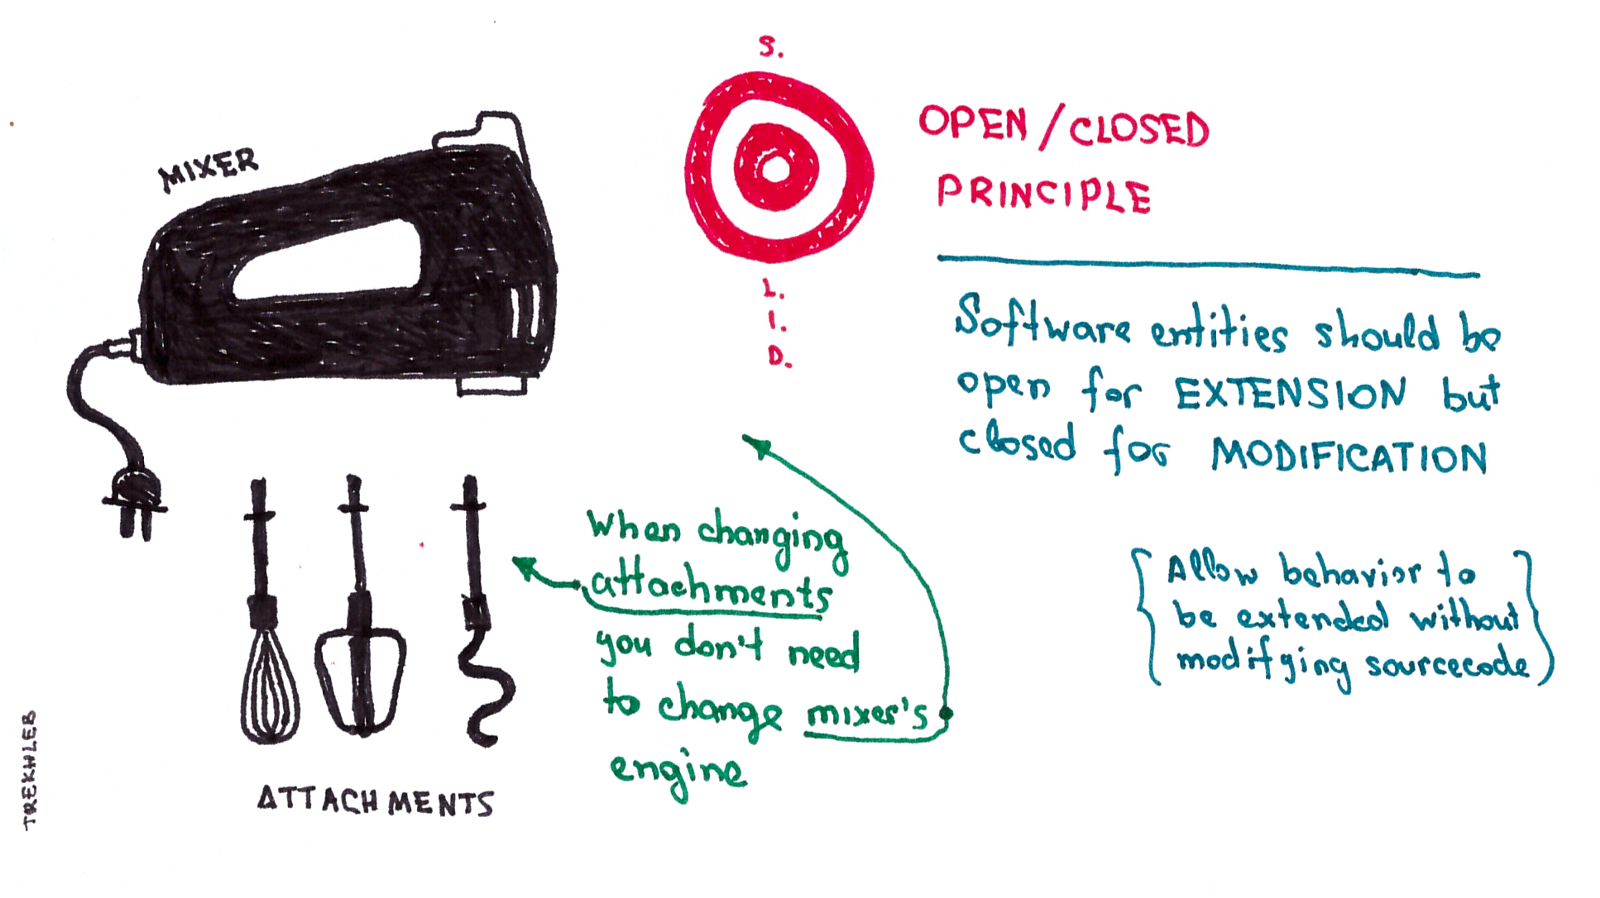
Un mod simplu de a implementa „Open-Closed principle” în WordPress
OCP este unul dintre principiile SOLID despre care am mai scris și aici. Vreau să-ți arăt o modalitate simplă prin care poți implementa asta chiar dacă nu ești fan OOP: folosind filtre! Sigur, nu este foarte încapsulată toată povestea, dar cred că este un compromis care merită făcut în majoritatea cazurilor. La proiectul la care…